
extract from https://b3n.org/freenas-9-3-on-vmware-esxi-6-0-guide/_
keep in mind, this is advanced, no default setup!
1. Get proper hardware
Hardware:
SuperMicro X10SL7-F (which has a built in LSI2308).
Xeon E3-1240v3
ECC Memory
Hard drives. The LSI2308 has 8 ports, I like do to two DC S3700s for a striped SLOG device and then do a RAID-Z2 of spinners on the other 6 slots. Also get one (preferably two for a mirror) drives that you will plug into the SATA ports (not on the LSI controller) for the local ESXi data store. I’m using DC S3700s because that’s what I have, but this doesn’t need to be fast storage, it’s just to put FreeNAS on.
2. Flash the LSI 2308 to IT firmware.
Here’s instructions to flash the firmware: http://hardforum.com/showthread.php?t=1758318 FreeNAS 9.3 wants P16, which you can get from Supermicro: ftp://ftp.supermicro.com/Driver/SAS/LSI/2308/Firmware/IT/Previous%20Releases/
UPDATE on Firmware: As of FreeNAS 9.3.1 the LSI drivers have been upgraded to v20 and now FreeNAS recommends the P20 firmware.
However, P20 is widely known to have bugs and performance issues, especially with fast SSDs I am surprised by the P20 move. I think it’s too aggressive to be moving to P20 firmware. On storage systems I like to see firmware in use for more than a year before upgrading to it. I’m surprised FreeNAS didn’t go with P19. It has been widely used and very stable in the OmniOS/Napp-It community, and several people running FreeBSD 10 found that P19 was stable after first trying P20.
I did a little research and found a few references to P20 having an initially buggy release, but the issues may have been fixed in P20.00.04.00 which was released in May 2015. I don’t know of anyone that has verified the issues were fixed. As of today (2015-09-21) Supermicro has only released up to P20.00.02.00 for my LSI2308 so I presume that’s the buggy version that shouldn’t be used.
So the options are to run P20 which is too new to put in production, run P16 or P19 with a mismatched v20 driver, downgrade the driver to v19, or don’t upgrade to 9.3.1. I really can’t recommend any of those options, they’re all bad. So I suggest having good backups.
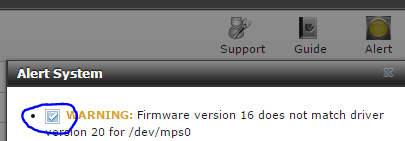
If you decide to run P16 or P19 on FreeNAS 9.3.1 which is what I’m doing (not that I am recommending this, I just think it’s the least bad option), this will result in a firmware driver mismatch amber warning light in FreeNAS, however you can un-check that alert to mute the warning.
3. Optional: Over-provision ZIL / SLOG SSDs.
If you’re going to use an SSD for SLOG you can over-provision them. You can boot into an Ubuntu LiveCD and use hdparm, instructions are here: https://www.thomas-krenn.com/en/wiki/SSD_Over-provisioning_using_hdparm You can also do this after after VMware is installed by passing the LSI controller to an Ubuntu VM (FreeNAS doesn’t have hdparm). I usually over-provision down to 8GB.
4. Install VMware ESXi 6
 The free version of the hypervisor is here. http://www.vmware.com/products/vsphere-hypervisor. I usually install it to a USB drive plugged into the motherboard’s internal header.
Under configuration, storage, click add storage. Choose one (or two) of the local storage disks plugged into your SATA ports (do not add a disk on your LSI controller).
5. Create a Virtual Storage Network.
For this example my VMware management IP is 10.2.0.231, the VMware Storage Network ip is 10.55.0.2, and the FreeNAS Storage Network IP is 10.55.1.2.
Create a virtual storage network with jumbo frames enabled.
VMware, Configuration, Add Networking. Virtual Machine…
Create a standard switch (uncheck any physical adapters).
![Image [8]](https://b3n.org/wp-content/uploads/2015/03/Image-8.png)
![Image [11]](https://b3n.org/wp-content/uploads/2015/03/Image-11.png)
Add Networking again, VMKernel, VMKernel… Select vSwitch1 (which you just created in the previous step), give it a network different than your main network. I use 10.55.0.0/16 for my storage so you’d put 10.55.0.2 for the IP and 255.255.0.0 for the netmask.
![Image [12]](https://b3n.org/wp-content/uploads/2015/03/Image-12.png)
Some people are having trouble with an MTU of 9000. I suggest leaving the MTU at 1500 and make sure everything works there before testing an MTU of 9000. Also, if you run into networking issues look at disabling TSO offloading (see comments).
Under vSwitch1 go to Properties, select vSwitch, Edit, change the MTU to 9000. Answer yes to the no active NICs warning.
![Image [14]](https://b3n.org/wp-content/uploads/2015/03/Image-14.png)
![Image [15]](https://b3n.org/wp-content/uploads/2015/03/Image-15.png)
Then select the Storage Kernel port, edit, and set the MTU to 9000.
![Image [17]](https://b3n.org/wp-content/uploads/2015/03/Image-17.png)
![Image [18]](https://b3n.org/wp-content/uploads/2015/03/Image-18.png)
6. Configure the LSI 2308 for Passthrough (VT-d).
Configuration, Advanced Settings, Configure Passthrough.
![Image [19]](https://b3n.org/wp-content/uploads/2015/03/Image-19.png)
Mark the LSI2308 controller for passthrough.
![Image [20]](https://b3n.org/wp-content/uploads/2015/03/Image-20.png)
You must have VT-d enabled in the BIOS for this to work so if it won’t let you for some reason check your BIOS settings.
Reboot VMware.
7. Create the FreeNAS VM.
Download the FreeNAS ISO from http://www.freenas.org/download-freenas-release.html
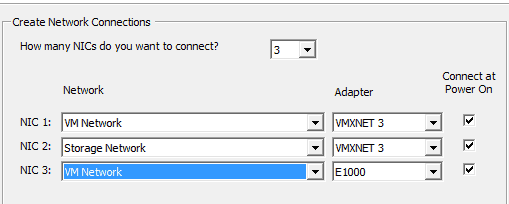
Create a new VM, choose custom, put it on one of the drives on the SATA ports, Virtual Machine version 11, Guest OS type is FreeBSD 64-bit, 1 socket and 2 cores. Try to give it at least 8GB of memory. On Networking give it three adapters, the 1st NIC should be assigned to the VM Network, 2nd NIC to the Storage network. Set both to VMXNET3. Then add a 3rd NIC and set it to E1000 and on the VM Network which we’ll use temporarily until the VMXNET3 drivers are up and running.
SCSI controller should be the default, LSI Logic Parallel.
Choose Edit the Virtual Machine before completion.
Here you can add a second boot drive for a mirror if you have two local storage drives.
Before finishing the creation of the VM click Add, select PCI Devices, and choose the LSI 2308.
![Image [32]](https://b3n.org/wp-content/uploads/2015/03/Image-32.png)
And be sure to go into the CD/DVD drive settings and set it to boot off the FreeNAS iso. Then finish creation of the VM.
8. Install FreeNAS.
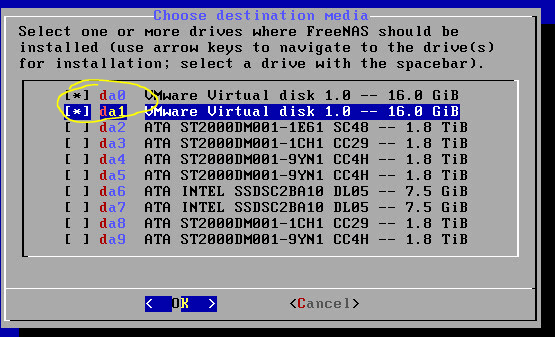
Boot of the VM, install it to your SATA drive (or two of them to mirror boot).
After it’s finished installing reboot.
9. Install VMware Tools.
The FreeBSD compat6x and perl packages are no longer available on their FTP site. I’ve updated the instructions to install the binary version from VMware Tools Installer.
In VMware right-click the FreeNAS VM, Choose Guest, then Install/Upgrade VMware Tools. You’ll then choose interactive mode.
Mount the CD-ROM and copy the VMware install files to FreeNAS:
|
1
2
3
4
5
6
|
# mkdir /mnt/cdrom
# mount -t cd9660 /dev/iso9660/VMware\ Tools /mnt/cdrom/
# cp /mnt/cdrom/vmware-freebsd-tools.tar.gz /root/
# tar -zxmf vmware-freebsd-tools.tar.gz
# cd vmware-tools-distrib/lib/modules/binary/FreeBSD9.0-amd64
# cp vmxnet3.ko /boot/modules
|
Once installed Navigate to the WebGUI, it starts out presenting a wizard, I usually set my language and timezone then exit the rest of the wizard.
Under System, Tunables…
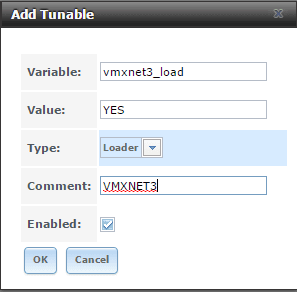
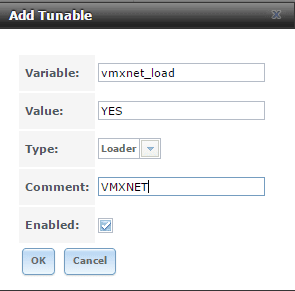
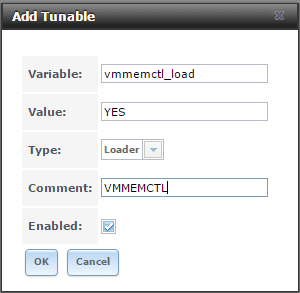
Add three Tunables. Variables for each should be: vmxnet3_load, vmxnet_load, and vmmemctl_load, The type should be Loader and the Value YES on all three.
(I think all that’s needed is the vmxnet3_load)
Reboot FreeNAS. On reboot you should notice that the VMXNET3 NICS now work (except the NIC on the storage network can’t find a DHCP server, but we’ll set it to static later), also you should notice that VMware is now reporting that VMware tools are installed.

If all looks well shutdown FreeNAS (you can now choose Shutdown Guest from VMware to safely power it off), remove the E1000 NIC and boot it back up (note that the IP address on the web gui will be different).
10. Update FreeNAS
Before doing anything let’s upgrade FreeNAS to the latest stable under System Update.
This is a great time to make some tea.
Once that’s done it should reboot. Then I always go back again and check for updates again to make sure there’s nothing left.
11. SSL Certificate on the Management Interface (optional)
On my DHCP server I’ll give FreeNAS a static IP, and setup an entry for it on my local DNS server. So for this example I’ll have a DNS entry on my internal network for stor1.b3n.org.
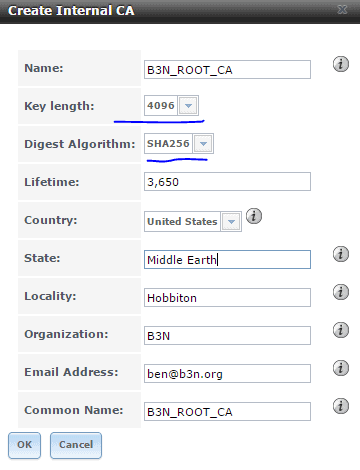
If you don’t have your own internal Certificate Authority you can create one right in FreeNAS:
System, CAs, Create internal CA. Increase the key length to 4096 and make sure the Digest Algorithm is set to SHA256.
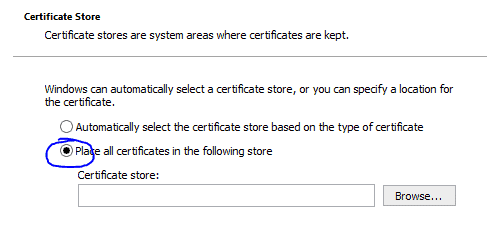
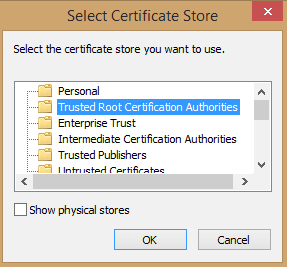
Click on the CA you just created, hit the Export Certificate button, click on it to install the Root certificate you just created on your computer. You can either install it just for your profile or for the local machine, I usually do local machine, and you’ll want to make sure to store it is in the Trusted Root Certificate Authorities store.
Just a warning, that you must keep this Root CA guarded, if a hacker were to access this he could generate certificates to impersonate anyone (including your bank) to initiate a MITM attack.
Also Export the Private Key of the CA and store it some place safe.
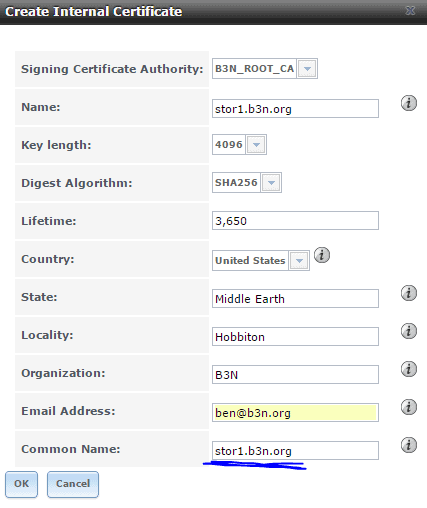
Now create the certificate…
System, Certificates, Create Internal Certificate. Once again bump the key length to 4096. The important part here is the Common Name must match your DNS entry. If you are going to access FreeNAS via IP then you should put the IP address in the Common Name field.
System, Information. Set the hostname to your dns name.
System, General. Change the protocol to HTTPS and select the certificate you created. Now you should be able to go to use https to access the FreeNAS WebGUI.
12. Setup Email Notifications
Account, Users, Root, Change Email, set to the email address you want to receive alerts (like if a drive fails or there’s an update available).
System, Advanced
Show console messages in the footer. Enable (I find it useful)
System Email…
Fill in your SMTP server info… and send a test email to make sure it works.
13. Setup a Proper Swap
FreeNAS by default creates a swap partition on each drive, and then stripes the swap across them so that if any one drive fails there’s a chance your system will crash. We don’t want this.
System, Advanced…
Swap size on each drive in GiB, affects new disks only. Setting this to 0 disables swap creation completely (STRONGLY DISCOURAGED). Set this to 0.
Open the shell. This will create a 4GB swap file (based on https://www.freebsd.org/doc/handbook/adding-swap-space.html)
|
1
2
|
dd if=/dev/zero of=/usr/swap0 bs=1m count=4096
chmod 0600 /usr/swap0
|
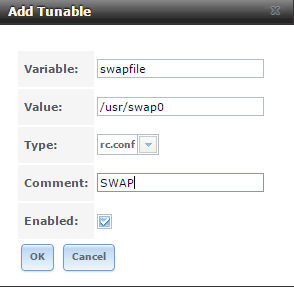
System, Tunables, Add Tunable.
Variable=swapfile, Value=/usr/swap0, Type=rc.conf
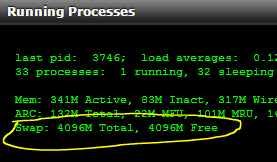
Next time you reboot on the left Navigation pane click Display System Processes and make sure the swap shows up. If so it’s working.
14. Configure FreeNAS Networking
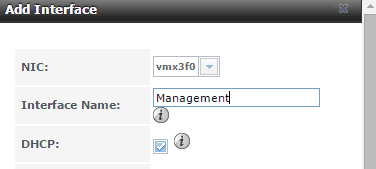
Setup the Management Network (which you are currently using to connect to the WebGUI).
Network, Interfaces, Add Interface, choose the Management NIC, vmx3f0, and set to DHCP.
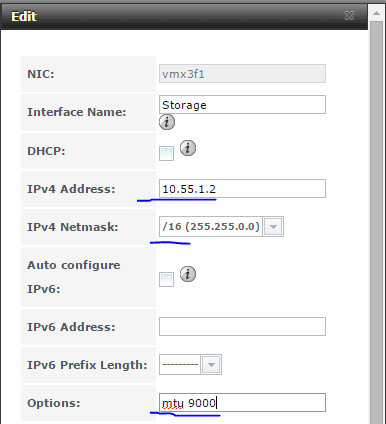
Setup the Storage Network
Add Interface, choose the Storage NIC, vmx3f1, and set to 10.55.1.2 (I setup my VMware hosts on 10.55.0.x and ZFS servers on 10.55.1.x), be sure to select /16 for the netmask. And set the mtu to 9000.
Open a shell and make sure you can ping the ESXi host at 10.55.0.2
Reboot. Let’s make sure the networking and swap stick.
15. Hard Drive Identification Setup
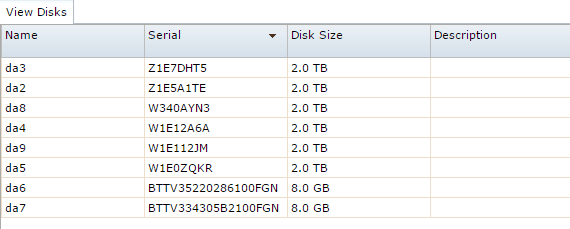
Label Drives. FreeNAS is great at detecting bad drives, but it’s not so great at telling you which physical drive is having an issue. It will tell you the serial number and that’s about it. But how confident are you in knowing which drive fails? If FreeNAS tells you that disk da3 (by the way, all these da numbers can change randomly) is having an issue how do you know which drive to pull? Under Storage, View Disks, you can see the serial number, this still isn’t entirely helpful because chances are you can’t see the serial number without pulling a drive. So we need to map them to slot numbers or labels of some sort.
There are two ways you can deal with this. The first, and my preference, is sas2ircu. Assuming you connected the cables between the LSI 2308 and the backplane in proper sequence sas2ircu will tell you the slot number the drives are plugged into on the LSI controller. Also if you’re using a backplane with an expander that supports SES2 it should also tell you which slots the drives are in. Try running this command:
|
1
|
# sas2ircu 0 display|less
|
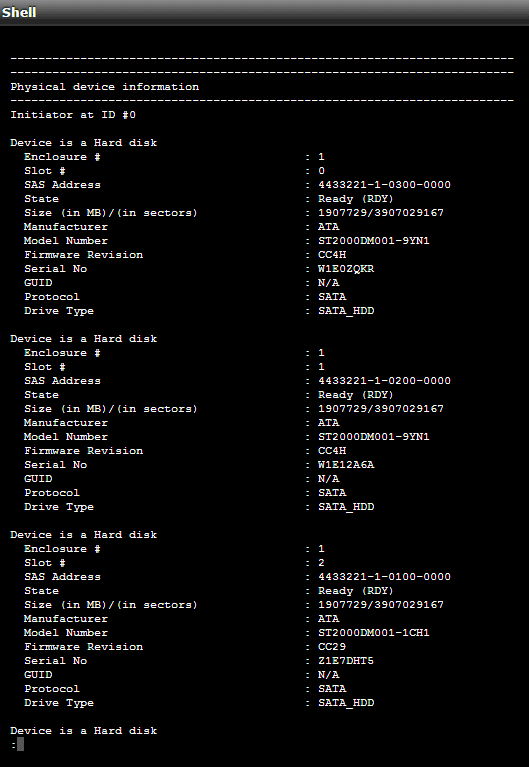
You can see that it tells you the slot number and maps it to the serial number. If you are comfortable that you know which physical drive each slot number is in then you should be okay.
If not, the second method, is remove all the drives from the LSI controller, and put in just the first drive and label it Slot 0 in the GUI by clicking on the drive, Edit, and enter a Description.
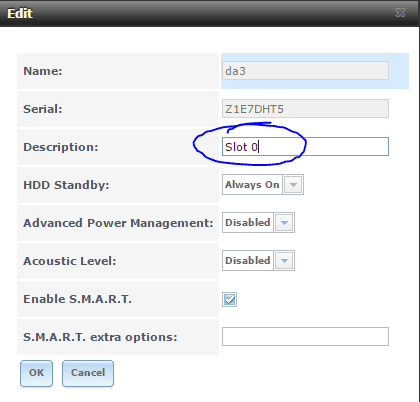

Put in the next drive in Slot 1 and label it, then insert the next drive and label it Slot 2 and so on…
The Description will show up in FreeNAS and it will survive reboots. it will also follow the drive even if you move it to a different slot. So it may be more appropriate to make your description match a label on the removable trays rather than the bay number.
It doesn’t matter if you label the drives or use sas2ircu, just make sure you’re confident that you can map a serial number to a physical drive before going forward.
16. Create the Pool.
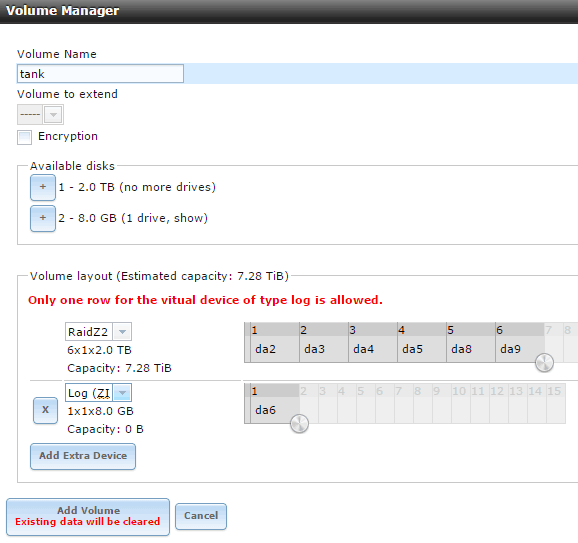
Storage, Volumes, Volume Manager.
Click the + next to your HDDs and add them to the pool as RAID-Z2.
Click the + next to the SSDs and add them to the pool. By default the SSDs will be on one row and two columns. This will create a mirror. If you want a stripe just add one Log device now and add the second one later. Make certain that you change the dropdown on the SSD to “Log (ZIL)” …it seems to lose this setting anytime you make any other changes so change that setting last. If you do not do this you will stripe the SSD with the HDDs and possibly create a situation where any one drive failure can result in data loss.
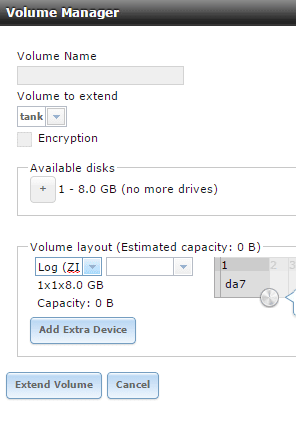
Back to Volume manager and add the second Log device…
I have on numerous occasions had the Log get changed to Stripe after I set it to Log, so just double-check by clicking on the top level tank, then the volume status icon and make sure it looks like this:
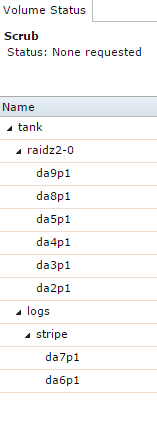
17. Create an NFS Share for VMware
You can create either an NFS share, or iSCSI share (or both) for VMware. First here’s how to setup an NFS share:
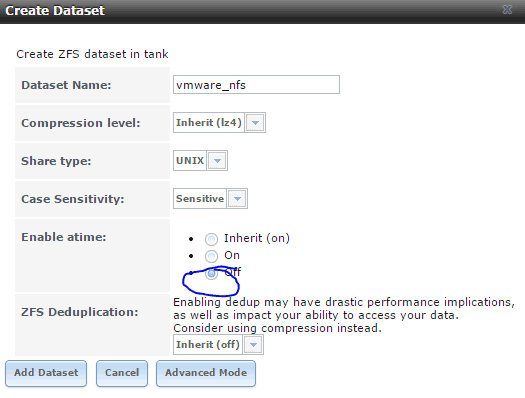
Storage, Volumes, Select the nested Tank, Create Data Set
Be sure to disable atime.
Sharing, NFS, Add Unix (NFS) Share. Add the vmware_nfs dataset, and grant access to the storage network, and map the root user to root.
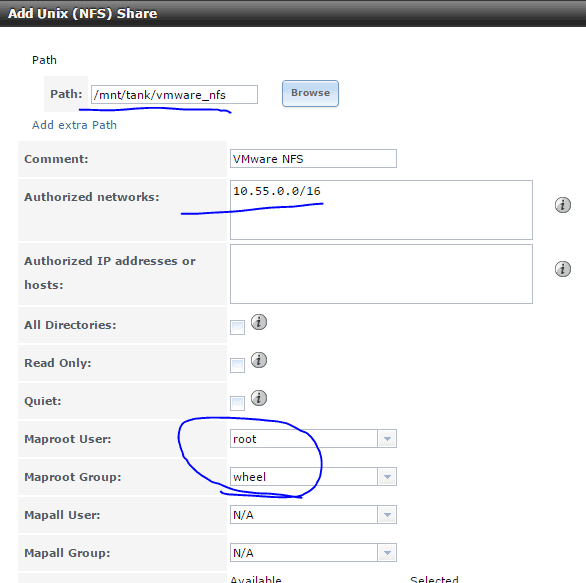
Answer yes to enable the NFS service.
In VMware, Configuration, Add Storage, Network File System and add the storage:
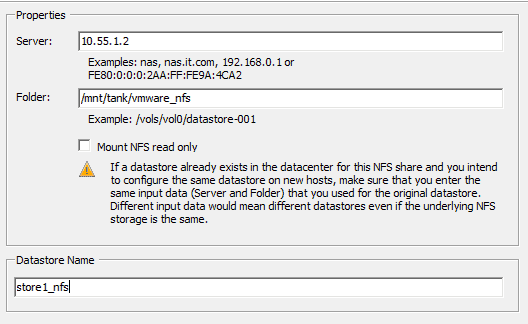
And there’s your storage!

18. Create an iSCSI share for VMware
Note that at this time, based on some of the comments below with people having connection drop issues on iSCSI I suggest testing with heavy concurrent loads to make sure it’s stable. Watch dmesg and /var/log/messages on FreeNAS for iSCSI timeouts. Personally I use NFS. But here’s how to enable iSCSI:
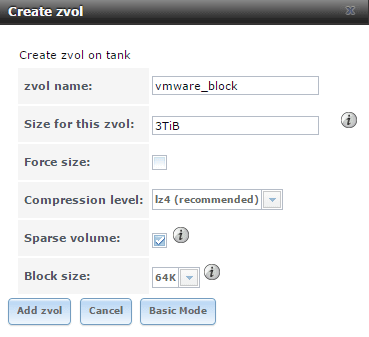
Storage, select the nested tank, Create Zvol. Be sure compression is set to lz4. Check Sparse Volume. Choose advanced mode and optionally change the default block size. I use 64K block-size based on some benchmarks I’ve done comparing 16K (the default), 64K, and 128K. 64K blocks didn’t really hurt random I/O but helped some on sequential performance, and also gives a better compression ratio. 128K blocks had the best better compression ratio but random I/O started to suffer so I think 64K is a good middle-ground. Various workloads will probably benefit from different block sizes.
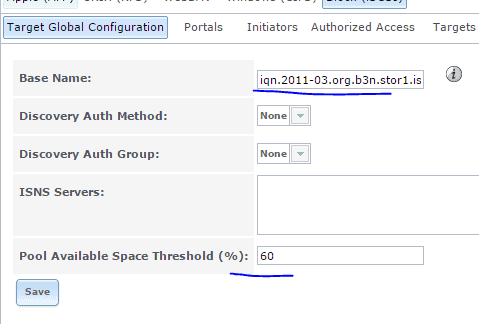
Sharing, Block (iSCSI), Target Global Configuration.
Set the base name to something sensible like: iqn.2011-03.org.b3n.stor1.istgt Set Pool Available Space Threshold to 60%
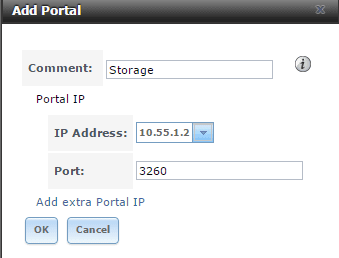
Portals tab… add a portal on the storage network.
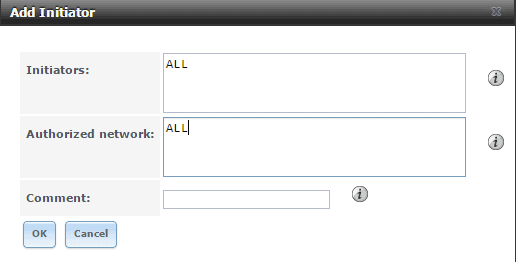
Initiator. Add Initiator.
Targets. Add Target.
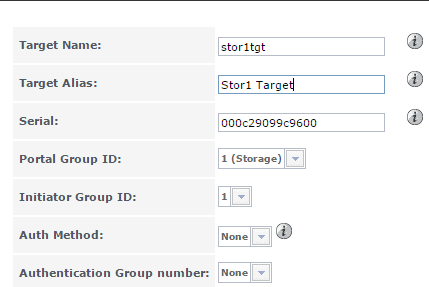
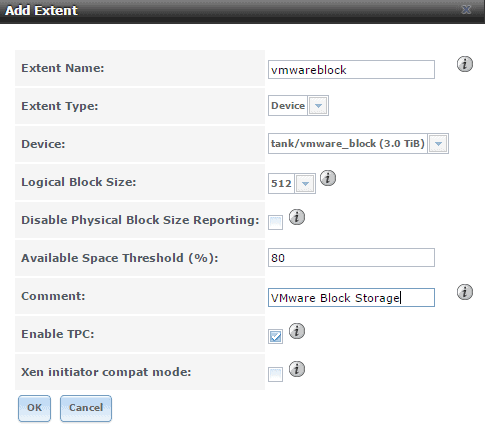
Extents. Add Extent.
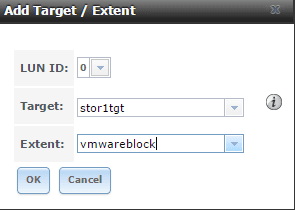
Associated Targets. Add Target / Extent.
Under Services enable iSCSI.
In VMware Configutration, Storage Adapters, Add Adapter, iSCSI.
Select the iSCSI Software Adapter in the adapters list and choose properties. Dynamic discovery tab. Add…
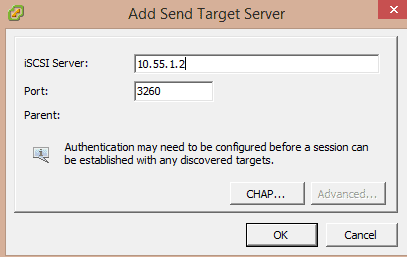
Close and re-scan the HBA / Adapter.
You should see your iSCSI block device appear…
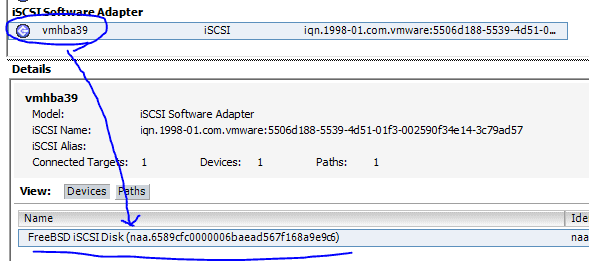
Configuration, Storage, Add Storage, Disk/LUN, select the FreeBSD iSCSi Disk,

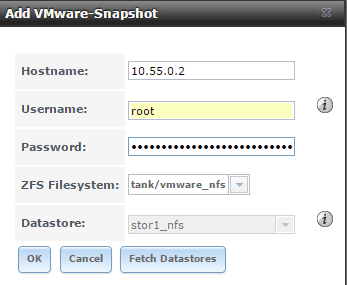
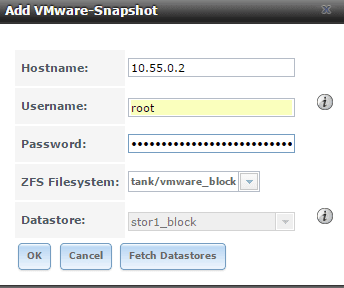
19. Setup ZFS VMware-Snapshot coordination.
Storage. Vmware-Snapshot. Add VMware-Snapshot. Map your ZFS dataset to the VMware data store.
20. Periodic Snapshots
Add periodic snapshot jobs for your VMware storage under Storage, Periodic Snapshot Tasks. You can setup different snapshot jobs with different retention policies.

21. ZFS Replication
If you have a second FreeNAS Server (say stor2.b3n.org) you can replicate the snapshots over to it. On stor1.b3n.org, Replication tasks, view public key. copy the key to the clipboard.
On the server you’re replicating to, stor2.b3n.org, go to Account, View Users, root, Modify User, and paste the public key into the SSH public Key field. Also create a dataset called “replicated”.
Back on stor1.b3n.org:
Add Replication. Do an SSH keyscan.
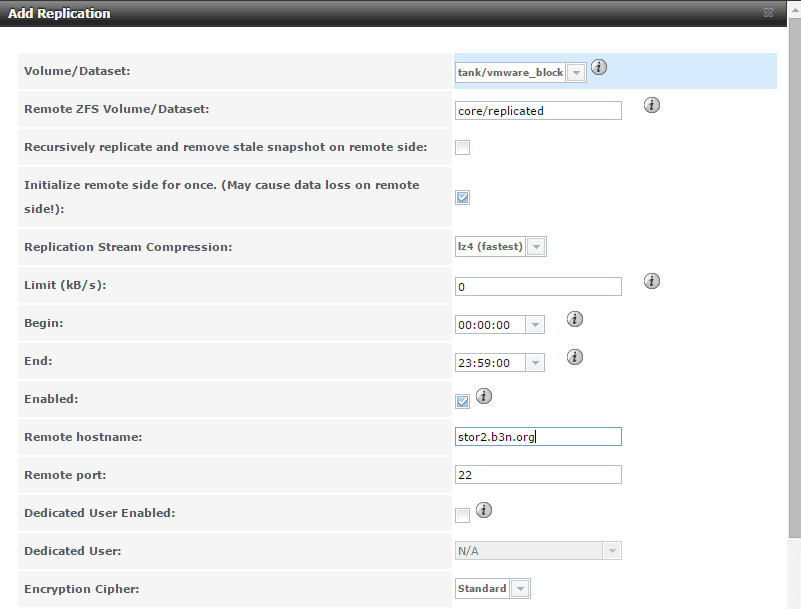
And repeat for any other datasets. Optionally you could also just replicate the entire pool with the recursive option.
21. Automatic Shutdown on UPS Battery Failure (Work in Progress).
The goal is on power loss, before the battery fails to shutdown all the VMware guests including FreeNAS. So far all I have gotten is the APC working with VMware. Edit the VM settings and add a USB controller, then add a USB device and select the UPS, in my case a APC Back-UPS ES 550G. Power FreeNAS back on.
On the shell type:
dmesg|grep APC
|
1
|
<span class=«shell_ff shell_be»>ugen0.4: <APC> at usbus0 </span>
|
This will tell you where the APC device is. IN my case it’s showing up on ugen0.4. I ended up having to grant world access to the UPS…
|
1
|
chmod 777 /dev/ugen0.4
|
For some reason I could not get the GUI to connect to the UPS, I can selected ugen0.4, but under the drivers dropdown I just have hyphens —— … I set it manually in /usr/local/etc/nut/ups.conf
|
1
2
3
4
|
[ups]
driver = usbhid–ups
port = /dev/ugen0.4
desc = «APC 1»
|
However, this file gets overwritten on reboot, and also the rc.conf setting doesn’t seem to stick. I added this tunable to get the rc.conf setting…
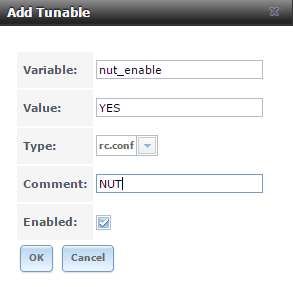
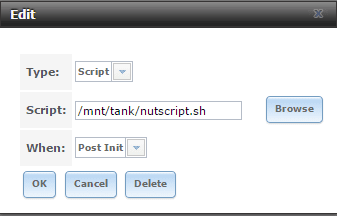
And I created my ups.conf file in /mnt/tank/ups.conf. Then I created a script to stop the nut service, copy my config file and restart the nut service in /mnt/tank/nutscript.sh
|
1
2
3
4
|
#!/bin/sh
service nut stop
cp /mnt/tank/ups.conf /usr/local/etc/nut/ups.conf
service nut start
|
Then under tasks, Init/Shutdown Scripts I added a task to run the script post init.
Next step is to configure automatic shutdown of the VMware server and all guests on it… I have not done this yet.
There’s a couple of approaches to take here. One is to install a NUT client on the ESXi, and the other is to have FreeNAS ssh into VMware and tell it to shutdown. I may update this section later if I ever get around to implementing it.
22. Backups.
Before going live make sure you have adequate backups! You can use ZFS mirroring with a fast link. For slow network connections Rsync will work better (Took under Tasks -> Rsync tasks) or use a cloud service like CrashPlan.